.png)


Thank you! Your submission has been received!
Oops! Something went wrong while submitting the form.


When customers want fast answers or need to explain something complex, they often reach for the phone. Even with all the digital communication options, a phone call still stands out.
The Dynamics 365 customer service voice channel add-in allows you to provide outstanding voice-based support in an integrated platform. The tool is built on Azure Communication Services and encompasses live AI capabilities such as call transcription and sentiment analysis, allowing your agents to resolve customer queries with ease while delivering unique experiences.
In this guide, you will learn to configure and streamline the voice channel, set up direct routing, handle phone numbers, and implement practical scenarios to streamline your customer service operations.
Phone support brings a level of connection and clarity that many digital channels can't offer. The voice channel in Dynamics 365 takes that traditional experience and brings it into a modern, integrated environment. It's not just about answering calls. It's about giving your team the tools to deliver fast, helpful, and personal support.
The voice channel also bridges gaps in omnichannel support. Customers may start with a chat but escalate to a call for complex issues. With the Dynamics 365 customer service voice channel add-in, you ensure a consistent experience across channels, as all interactions share the same data framework.
To implement this functionality, there are a few prerequisites that must be in place before you can begin configuration.
Before you jump into setting up the voice channel in Dynamics 365, there are a few things you need to have ready. It’s better to get this stuff sorted first so you don’t run into problems halfway through the setup.
With the foundation in place, you're ready to start setting up the voice channel in your Dynamics 365 environment.
Also Read: Comprehensive Overview of Dynamics 365 Customer Insights
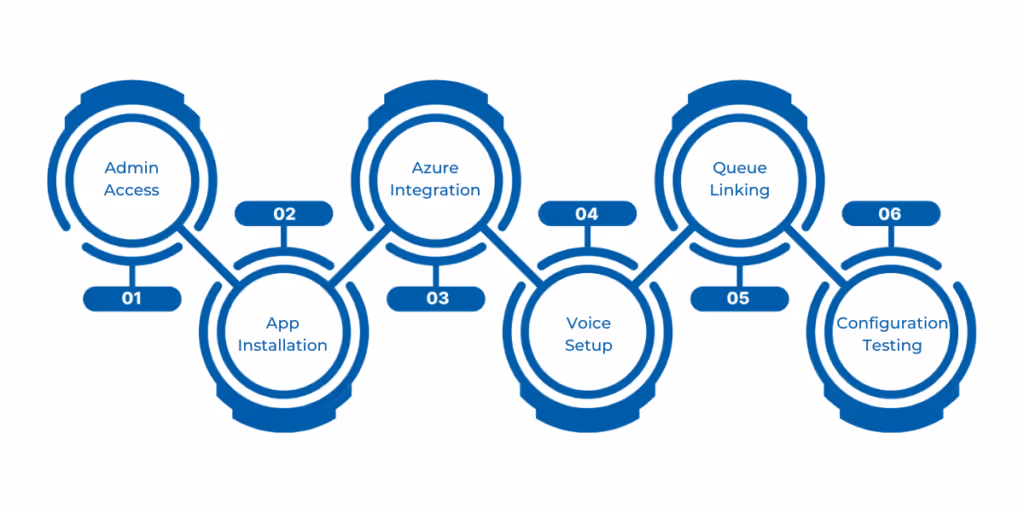
Getting the Dynamics 365 customer service voice channel add-in up and running in your Dynamics 365 environment is a critical step to delivering seamless voice support. This process involves installing components, connecting to Azure Communication Services, and configuring settings to ensure calls flow smoothly to your agents. Here’s how to configure the voice channel:
For an existing one, input the resource name, connection string, and app registration details (Application ID and Tenant ID) from the Azure portal. This connection enables call handling and AI features like sentiment analysis.
To get the most out of the voice channel’s capabilities, it’s essential to understand the role of Azure Communication Services.
Azure Communication Services (ACS) is basically what makes the voice channel work behind the scenes in Dynamics 365. It’s the part that handles things like calls, texts, and some cool features like transcriptions and call recordings. If you're planning to use the voice channel in Dynamics, you'll need to get ACS set up first.
To do that, you go to the Azure portal and look up “Communication Services.” Once you're there, you can create a new resource, just give it a name, pick your subscription, and choose a resource group. After it’s created, you’ll get a connection string and resource ID. Keep those handy, because you’ll need them later to link everything to Dynamics 365.
ACS also lets you get phone numbers, either straight from Microsoft (if they’re available in your region) or you can bring your own number using something called direct routing. This gives you a bit more flexibility, especially if your company already has phone lines it wants to keep using.
If you want to enable things like call recording or transcriptions, you’ll have to do a bit of extra setup in Azure. You’ll need to register an app in Azure Active Directory to get your Application ID and Tenant ID. Then, in the Azure portal, set up an Event Grid subscription and hook it up to Dynamics 365 with a webhook URL. This is how it captures and stores stuff like transcriptions and recordings.
You can also use ACS to keep track of call quality. It gives you stats on things like how much delay there is or if any data packets were lost during a call. That’s helpful for troubleshooting if people are having connection issues.
Now, if your organization already has a phone service provider and doesn’t want to switch to Microsoft’s numbers, that’s totally fine. That’s where direct routing comes in, and we’ll go into that next.
For more information, read Microsoft’s official documentation.
If Microsoft’s PSTN services aren’t available in your region or you prefer using an existing carrier, Azure direct routing lets you bring your own carrier to the Dynamics 365 customer service voice channel add-in. This configuration requires careful setup to ensure compatibility and performance.
In the Azure portal, open your Azure Communication Services resource and select “Direct Routing” under “Telephony and SMS.” Click “Add domain” to register your carrier’s Session Border Controller (SBC) domain, then verify it. Next, go to the “Session Border Controllers” tab and add your SBC’s fully qualified domain name (FQDN) and signal port number. Configure voice routes to define how calls are handled between your SBC and Azure Communication Services.
In Dynamics 365, go to the Customer Service Admin Center, select “Channels,” then “Phone Numbers,” and click “Advanced.” Choose “Add number” for “Bring your own number via Azure Direct Routing,” entering the phone number in E.164 format. Sync the number to your voice workstream, and test the configuration with a call to verify connectivity.
Just make sure your SBC meets Microsoft’s specs and that media endpoints are publicly accessible. Keeping everything geographically close, SBC, Azure, and Dynamics, can help cut down latency.
Once your connectivity is in place, managing phone numbers becomes essential for routing calls effectively and maintaining operational efficiency.
Effective phone number management is critical for the Dynamics 365 customer service voice channel add-in, ensuring your customers can reach you and agents can make outbound calls. Dynamics 365 provides robust tools to acquire, configure, and maintain phone numbers.
Now that the system is configured and integrated, let’s explore how different industries can use the voice channel to solve real-world challenges.
For more information, read Microsoft’s official documentation.
The Dynamics 365 customer service voice channel add-in adapts to various business needs, offering flexible implementation scenarios to enhance customer support. Here are three practical examples.
The bank uses call recording for training and audits, with Azure Event Grid subscriptions capturing recordings securely. This setup reduces costs while using Dynamics 365’s AI features for fraud detection during calls.
Calls requiring human intervention are routed to agents with access to patient histories, ensuring personalized service. Real-time analytics help supervisors monitor call volumes, optimizing staff allocation during peak times.
These scenarios demonstrate how the Dynamics 365 customer service voice channel add-in can be tailored to meet diverse operational needs, driving efficiency and customer satisfaction.
The Dynamics 365 voice channel is truly a game-changer if you're looking to level up your customer service. With features like live transcription and sentiment analysis (powered by Azure Communication Services), it helps your support team work faster and smarter.
If you’re stuck or don’t want to deal with all the setup headaches, it’s not a bad idea to get help from someone who’s done it before. WaferWire has a team that knows their way around Dynamics and can help you get everything working the way you need. It just saves time and avoids frustration. Reach out to WaferWire today if you want to take your voice support to the next level.
1. What is the Dynamics 365 Customer Service Voice Channel Add-In?
The voice channel add-in is an extension for Dynamics 365 Customer Service that enables integrated voice-based support using Azure Communication Services (ACS). It includes features like real-time call transcription, sentiment analysis, and intelligent routing to enhance customer interactions.
2. What are the prerequisites for setting up the voice channel?
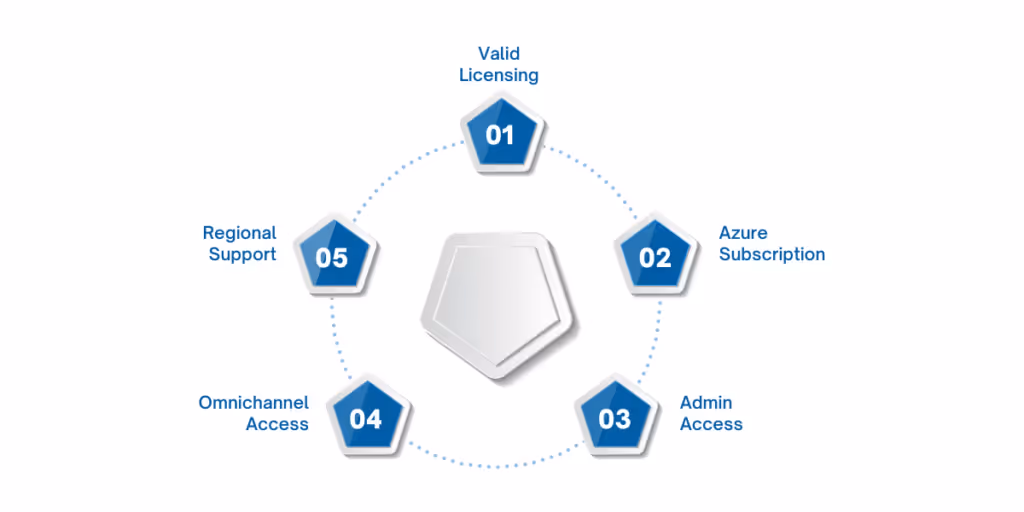
To set up the voice channel, you’ll need:
1. A valid license for the Voice Add-In or Digital Messaging and Voice bundle
2. An Azure subscription under the same tenant as Dynamics 365
3. Admin rights in both Azure and Dynamics 365
4. The Omnichannel for Customer Service app installed
5. Regional support for ACS in your location
3. Do I need Azure Communication Services (ACS) to use the voice channel?
Yes. ACS powers the voice features in Dynamics 365. You'll need to create and configure an ACS resource in Azure to enable telephony, transcriptions, and recordings.
4. What is direct routing and when should I use it?
Direct routing allows you to use your existing telephony provider instead of Microsoft’s phone services. It’s ideal when:
1. Microsoft’s phone numbers aren’t available in your region
2. You want to retain your current telecom setup
3. You require custom routing through a certified Session Border Controller (SBC)
5. Can I use my own phone numbers in Dynamics 365?
Yes. You can bring your own numbers using direct routing or acquire new ones directly through ACS if available in your region. Numbers can be assigned to queues, agents, or used for outbound calls.


